

Easy Halloween Crafts Using Things You Already Have at Home
Halloween is getting closer, which means it’s officially time to lean into the spooky season. The costumes are starting to take shape, the treat aisle is looking increasingly tempting, and kids everywhere are beginning to think about ghosts, witches, pumpkins and all the other wonderfully strange things that come with October. It’s also a lovely excuse to make something together!
You don’t need a cupboard full of craft supplies or a trip to the shops for a bag of Halloween-themed pom poms. Some of the best Halloween crafts can be made from things that are already hanging around the house: old cardboard, empty jars, toilet rolls, paper bags, egg cartons, newspaper and whatever bits and pieces have accumulated in the art drawer. The fun is really in giving ordinary things a slightly spooky makeover.
Paper Plate Ghosts
If you have paper plates left over from a party, picnic or birthday, you have the beginnings of a little ghost army.
Turn a plate upside down and let the kids paint it white, or simply leave it plain if you want to keep things easy. Once it’s dry, add two black eyes and a spooky mouth with a marker, paint or scraps of black paper. Cut strips of white paper or tissue paper for the bottom and glue them around the edge so the ghost has something floaty to trail behind it.
Hang a few from windows, doorways or branches outside and suddenly the house has a Halloween decoration that looks much more impressive than the amount of effort involved would suggest.
Toilet Roll Bats
The humble toilet roll has been waiting for its moment. Paint or cover an empty toilet roll in black, then add a pair of wings cut from cardboard or thick paper. A couple of googly eyes are fun if you have them, but little circles of white paper work just as well. Draw on tiny fangs, give your bat some silly eyebrows or let the kids decide whether theirs is spooky, friendly or slightly confused.
You can hang them from string, line them up along a shelf or make a whole family of bats in different sizes.
Egg Carton Spiders
Save a few sections from an empty egg carton and turn them into little spiders. Paint each piece black, then add eight legs using strips of paper, pipe cleaners or pieces of cardboard.
The legs don't need to be perfectly even. In fact, they’re probably more charming when they aren’t. Add eyes, spots or tiny paper mouths and let the kids give each spider a name. These make particularly good little decorations for a Halloween table, bookshelf or windowsill.
Ghost Jars
An empty glass jar can become a surprisingly sweet Halloween lantern. Give the outside a thin coat of white paint and leave it to dry, then add a couple of black eyes and a mouth. You could also wrap the jar in white tissue paper or scraps of white paper if you’d rather avoid painting.
Pop a battery-operated tea light inside and line a few along a table or windowsill. They have that lovely homemade Halloween feeling without requiring much more than an empty jar and a little creativity.
Cardboard Haunted Houses
Before the next cardboard box makes its way to the recycling bin, put it aside for a little while. Cut simple house shapes from the cardboard and let the kids paint them black, grey, brown or whatever colours they fancy. Once dry, they can add windows, doors, crooked chimneys, bats, ghosts and tiny paper pumpkins. Older children might enjoy cutting out windows and doors so light can shine through from behind. You could make one enormous haunted house together or create a whole little Halloween street from smaller boxes and cereal cartons.
Felt Ghosts
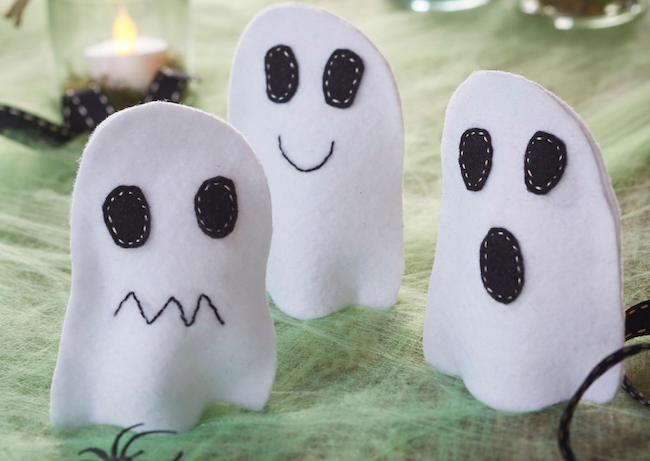
These little felt ghosts are such a cute one for kids, and you can make a version with stuff you probably already have at home. Cut two matching ghost shapes out of white felt (or an old white t-shirt, pillowcase, or even thick white paper if you don't have felt), with a wavy bottom edge so they look like they're floating. Cut small ovals and a mouth from black felt or construction paper, then stitch them on with white thread for that little dashed look, or just glue them on with craft glue if sewing feels like too much. Give each ghost a different face (happy, spooked, shocked) so they all have their own personality. Then stitch or glue the two ghost shapes together around the edges and stuff lightly with cotton balls, tissue, or scrap fabric so they stand up on their own. Set them out on a table with some fake cobwebs or a tea light for a spooky little display.
Spooky Paper Bunting
Bunting is one of those crafts that instantly makes a room feel festive, and Halloween gives you plenty of shapes to work with. Cut triangles from old wrapping paper, newspaper, brown paper bags or pieces of cardboard. Paint or draw little ghosts, pumpkins, bats, cats and monsters onto them, then string them together with wool, ribbon or whatever you have in the sewing basket. It doesn’t need to match. A slightly wonky row of handmade decorations is exactly the point.
Mummy Jars
For a very easy afternoon craft, find a few empty jars and wrap them in strips of white fabric, gauze, an old pillowcase or even toilet paper. Glue on a pair of eyes and you have a tiny collection of mummy jars. If you’re using toilet paper, they’re best kept somewhere dry and treated as an indoor decoration. Add battery-operated lights inside and they become little glowing mummies for the Halloween table.
Cardboard Tube Monsters
Keep those toilet rolls coming!! Cover cardboard tubes with paper or paint, then let the kids turn them into monsters. They can add giant eyes, pointy teeth, silly hair, horns, ears, wings or anything else their imaginations come up with.
This one is particularly good for younger children because there really isn't a wrong way to do it. A monster with six eyes and purple hair is just as successful as one that looks vaguely like Frankenstein.
Painted Rocks
If you have a collection of smooth stones from the garden or from a previous walk, bring a few inside and turn them into tiny Halloween characters.
Paint them as pumpkins, ghosts, spiders, bats or little monsters. Once they’re dry, they can become decorations for a garden, pot plant, bookshelf or Halloween table.
It’s also a nice excuse to go outside together and collect the materials before you even start crafting.
A Halloween Window
You don’t necessarily need to make a three-dimensional decoration at all. A roll of plain paper, some cardboard or even old newspaper can become a whole Halloween scene for a window.
Cut out black bats, crooked trees, cats, witches' hats or little haunted houses and stick them to the inside of the glass. Add white paper ghosts or yellow moons, then see what the whole scene looks like once the lights are on at night.
Let the children design the scene themselves. It might be considerably more chaotic than anything you would have planned, which is usually what makes these things memorable.
Make Your Own Halloween Garland
For something that can stay up throughout October, make a simple garland from whatever paper you have at home. Cut out circles, leaves, pumpkins, ghosts or stars and decorate them with crayons, pencils, paint or markers. Punch a hole in each piece and thread them onto string or ribbon.
You can even use old children's drawings, scraps from previous craft projects or pages from magazines. Halloween doesn't need to mean buying a new collection of decorations every year. Making a few familiar things feel festive can be enough.
And perhaps that's the nicest part of doing Halloween crafts at home! The finished decorations don't need to look like they came from a shop. A slightly lopsided ghost hanging from the kitchen window, a cardboard bat with enormous eyes or a row of painted stones on the doorstep carries a little more personality anyway. With Halloween only a couple of weeks away, put the kettle on, clear a space at the table and see what you already have before heading out to buy anything. Give the recycling box a second look. Raid the art drawer. Find the glue stick that has somehow become completely cemented shut. Then make a little mess and enjoy the spooky season together.